Gluten/Dairy/Egg/Corn Free and Vegan. This Cheesecake is wonderful- Grand Marnier and Orange Zest send it over the top.
- Prep Time :
30 min - Cook Time :
60 min - Ready Time :
1 hour, 30 min
Servings
Ingredients
- 2 cups Crushed (unfrosted) Oreo's (Roughly 25 Individual Oreo Cookies)
- 3 tablespoons Melted Earth Balance Butter or Oil
- 3 Packages Tofutti Cream Cheese (or other brand) (Each package is 8 oz)
- 1 (1 lb) Package Silken Tofu (I Used Nasoya Silken Tofu)
- 2 teaspoons Vanilla Extract
- 1 teaspoon Orange Extract
- 1/4 teaspoon Salt
- 4 tablespoons Arrowroot (Corn Starch could also be used)
- 2 tablespoons Ener-G Egg Replacer (Use dry- do not mix with water called for on box)
- 1 Cup + 2 TBS Sugar
- 2 1/2 tablespoons Grand Marnier
- zest of 1 orange
514
- 1/3 cup Sugar
- 3/4 cup Fresh Cranberries
- 1/4 cup Grand Marnier
Directions
This week- I went through 9 packages of Tofutti Cream cheese and roughly 5 packages of Silken Tofu to get this recipe- JUST right. I did a very large Internet search and the majority of the comments on the other Vegan cheesecake recipes were pretty consistent- People complained that the cheesecakes tasted more like flan.. Or that they were good- but not a cheesecake. I was determined to make an AUTHENTIC cheesecake. Allergies should NOT come in the way of enjoying food in the same form that everyone else does.
Note* I recently figured out that Tofutti is not 100% gluten free. Typically its Safe for the Gluten Intolerant- but not necessarily for the Celiacs out there. (Boo!) So I wanted to note that any other non-dairy “cream Cheese” Can be used in this recipe. Try using The Cream Cheese from the company Follow Your Heart instead!
I made this cheesecake 3 times this week.. My first attempt turned out delicious BUT flan(ny) – The second cheesecake was TOO cheesy- not quite firm enough. It was a matter of figuring out the perfect ratio between the Tofutti Cream Cheese, Silken Tofu and Arrowroot. And THIS cheesecake finally was perfect. Absolutely Perfect.
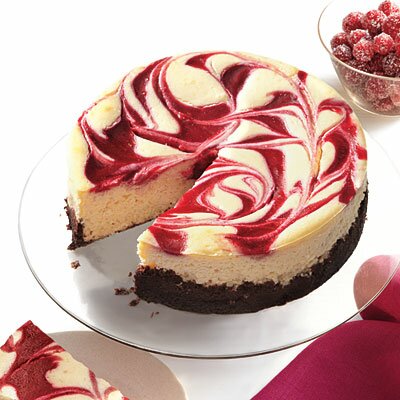
My inspiration for this recipe came from the cover of Cooking Light. Their Cranberry Swirl Cheesecake photo took my breath away (and the photo is actually the one pictured above- I’m using it as my recipe looks EXACTLY the same- and with all the Christmas chaos I did not have a chance to get a good photo) The cooking light Cheesecake recipe it VERY different than mine – I brought in some orange Flavor- Via Orange Zest, Extract and Grand Marnier.
For the Crust- I opted to use Crushed Oreo’s! (Oreo’s WITHOUT their Filling) I used my Gluten Free/Vegan Authentic Oreo Cookies. I make these in excess and always keep a bag of un-frosted cookies in the freezer as I find all kinds of fun uses for them. Its a little extra work to have to make the crust- BUT it will be well worth your time. I PROMISE.
You could also use my recipe for Gingerbread Graham Crackers as the base of the Cheesecake. but I would recommend the Oreos as I LOVED the chocolate flavor with the Cranberry and Orange.
Make this cheesecake the day before you plan serving it- it will need the time to Chill in the fridge. You will notice that when you remove the cheesecake from the oven it was have a slightly yellow hue- this will go away as it chills- After an evening in the fridge it will have a wonderful creamy white hue.
- Prepare the crust. Make the Gluten Free/Vegan Authentic Oreo Cookies. Allow them to cool and then place them in a food processor or by hand Crush the Cookies Finely (do not bother with making the frosting that the oreo recipe calls for) . Mix in 3 TBS of Melted Earth Balance Butter OR any Mild Flavored Oil of your choice.
- Preheat oven to 350 degrees. Prepare your Cheesecake Spring form Pan- Cut and place parchment paper on the bottom or the pan or Wrap in tinfoil. Place the Oreo Cookie Crumbs into the pan and press down evenly using the bottom of a glass or a spoon. After you do this- spray the remaining exposed sides of the pan with non stick spray. ( I like to do this AFTER I put the crust into the pan so that the Oreo does not stick to the sides- which in the end will create a messy looking cheesecake)
- Drain the Tofu using Paper Towels. Multiple times press down to remove as much liquid as possible. I use several pieces of Paper towell- The Tofu will break apart as you do this.
- Clean your Food Processor – and Combine in it the Drained Silken Tofu, and 3 packages of Tofutti Cream Cheese. Mix in the Vanilla and Orange Extract, Salt, Arrowroot, Egg Replacer, Sugar, Grand Marnier and Orange Zest.
- Pour the mix on top of the Crushed Oreo mixture in the pan. Set aside.
- Clean the Food Processor again- and have it ready for the cranberry sauce..
- Make the Cranberry Sauce- in a sauce pan over the stove combine the Sugar, Grand Marnier and Cranberries. Heat over medium heat until all the cranberries begin to burst open. (The sugar may boil some too) Place this mixture into the food processor and blend.
- Spoon 1/2 teaspoon of cranberry sauce in the form of little circles over the cheesecake. (Think spaced out polka dots) Using a knife or toothpick (or even a thin straw) Swirl the Cranberry around the surface of the cheesecake to your liking.( The way it looks going into the oven is the way the swirls will look when you serve it- keep this in mind)
- Bring a tea kettle full of water to a boil. (to be used as a water bath) Place the Cheesecake spring form pan into a large casserole dish (or whatever you have that is larger) Open your oven and place in the Casserole Dish into the oven..Carefully Pour the boiling water into the casserole dish around the cheesecake pan. (DO NOT pour any water on the cheesecake!! )
- Close the oven and bake for 1 hour. After the hour turn the oven OFF off and leave the cheesecake in it for another hour. During this 2 hour block DO NOT open the oven (not even once) Have faith that everything is doing what it is supposed to do

- After the 2 hours remove the cheesecake from the Oven. Remove the Spring form pan from the water bath. Cover the Spring form Pan with Ceran wrap and place in the fridge overnight.
- Just before serving- run a sharp knife around the edge of the cheesecake in the pan- open the spring form pan and serve. (I usually just serve my cheesecake still in the base of the spring form pan- if you feel confident you could remove the cheesecake from it- But I don’t bother. )
This cheesecake like any cheesecake will yellow if it is left at room tempt for hours on end. I find it taste best chilled- It will still taste yummy after being out for an hour or so- but I like it best cold.
If you do not have a Large Food Processor- you could also use a blender!
This Recipe has been linked up to Slighty Indulgent Tuesdays!


{ 5 comments… read them below or add one }
Wow – so creamy and Yummy – don't even tell your friends what this doesn't contain, they will never ever guess! Thanks for sharing this with the family Brittany – so yummy.
Looks awesome! Just fyi, though, I have celiac disease and
using tofutti cream cheese would be a no-no for me, as tofutti
includes hidden gluten in it's ingredients (or somewhere… the
manufacturer's just claim it is "not" gluten free). Regardless,
lots of people with a gluten intolerance have had bad tummy
reactions to this stuff- might be good to know in case one happens
to be feeding your yummy looking recipe to someone with celiac.
I made this "cheesecake" yesterday and three non-vegan people stated that it tasted like real cheesecake. What better compliment can one get? Delicious!
That REALLY is the best compliment one can get- thank you SO much for sharing that with me (It took me several tries to get it the way I wanted it:) So its reallllly heartwarming to hear someone else had success. xoxo Brittany
What pan size should I use and how many servings does this make? Thanks